Sponsored by:
How I Got My New Dock And Ramp At Tahoe Keys
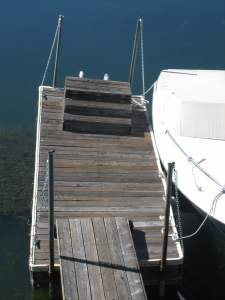 It started with a letter from the
Tahoe Keys Property Owners Association. The note suggested my
dock was substandard and not very level. This was not a surprise
to me. The dock was a 24 year-old wooden one with some missing
and misplaced floats. Use of the dock had become more of a
sobriety test than anything else.
To limit the instability, I had hung the dock on chains from its four poles giving me the one and only suspension dock in the area. I informed the TKPOA that since it was fall, there was not much I could do until spring. They agreed.
To cross the point of no return, I removed all the planking from the dock and ramp. When the winter arrived in full, the lagoon froze. That made it easy to remove the frame that hung above the ice. Just the four poles remained in place.
I first imagined replacing my old finger dock with something considerably more elaborate. A U-shape with a large shore platform occupied my mind for a while. But then it struck me that what I enjoyed about the view was the lagoon and not the structures that surrounded it. That same view also made it obvious that the bigger the dock, the more likely it was to have problems--especially U-shaped ones. So, I decided to go with the same practical shape and size--6 by 18 feet. The old dock had served its purpose well until it became kaput.
As the end of winter approached, I searched the Internet for dock kits. I enjoy home projects and hoped to save some money by investing my own labor. I won't bore you with the multiple paths that went nowhere. Ultimately I happened across a web page for a place called ACS Marine in Stockton. ACS builds aluminum docks, ramps, and other waterfront items. I knew aluminum to be the ideal maintenance-free material for the job.
I visited ACS Marine a week or two later. The place glistens with shining aluminum bars, tubes, and planks along with sparks flying from welding in progress. If I had not known better, I might have thought they were constructing airplane wings. For decking they had a number of nice options. I discussed pricing with the owner and was surprised when he calculated amounts that were even less than the wood or steel kits I had investigated.
(Aside: one popular decking material, not available with ACS, is something called Trex. The ideal decking material would be non-skid, weather tough, strong, ridgid, and light weight. Trex is not very ridgid and it is relatively heavy which is why I would avoid it. Trex comes in the shape of lumber if you want more of a wood deck impression.)
Before ordering, I needed the approval of the TKPOA Architecture Committee. To show I had plenty of space, I took pictures in all directions from my deck and pasted together a complete panorama. On this, I drew arrows and wrote in distances to everything in sight. I also got a sample of the decking material and took pictures of similar docks and ramps built by ACS. I actually chose a ramp that was not my favorite because it looked more like other Keys’ ramps. I had been informed that conserving the Keys’ look is one criterion the committee applies.
The one possible bone of contention appeared to be a requirement that only a few inches of the underlying floats should show. I personally liked the ice cream sandwich look of ACS docks, so I asked for an exemption to that rule. I prefer nice functional design to decoration and believe the skirting can make a dock look more like a giant floating brick and accumulate grime. So with my application, I included pictures of docks that followed the standard but looked clumsy and dirty. A little cherry picking, I suppose. Happily, the committee looked at all the pictures provided and granted the exemption.
Some weeks later, ACS had a dock and ramp built for me. I dropped by with my boat trailer and the items were strapped onto it. (Note: if your dock has a shore side and deep end side, make sure you place the ramp accordingly--shore side over shore side. The dock fittings on the back end of your trailer are what you will attach to the boat. If that makes a difference, get it right.) Two things I do not recommend are dragging the stuff over Echo Summit during a late spring snowstorm and pulling the dock and ramp on the lake with a 30+ mile an hour wind. I guess I got a bit impatient waiting for good weather. Anyway, the dock launched and floated nicely off the trailer with the ramp tightly strapped to it. It tows a bit like a water skier, so you want to avoid sharp whipping turns and keep away from everything. Arriving at my home, I tied one corner of the dock to one pole. My neighbor then practiced his tugboat skills pushing the dock into position and allowing me to tie the other end.
I did not feel entirely confident about attaching the ramp solidly to the shore, so I solicited another neighbor and contractor, John Donmoyer, to help. You need two people lifting and having one with the ideal tools is essential: a post shovel, a serious sledgehammer, a powerful drill and bits, a Sawz-All, and a wheel barrow to mix concrete. John popped up with other tools and gadgets of value as the project proceeded. I set the shore end to be just ten inches above the high-water mark for Tahoe so the ramp will be going up about six inches in that rare case. This setting should get me past low water levels without having to add a box of steps on the dock end to keep the ramp from falling off. Think about the right edge of a circle and how a ramp will move in and out over the dock as depth changes. If you start with a pleasing downward slope at the high water mark, you might get yourself in trouble.
Changing gears a bit, here is a crucial mount and most difficult task. You see, I want to give some practical useful advice too. But use it at your own risk. This worked for us.
The ramp comes with an axle mount,
axle, and two hinges with three holes each to secure against
something. I put the pin through the ramp and both hinges and
added the provided clips to keep the axel from sliding out. I cut
a 2 by 8 to the size plus a few inches and drilled holes in the 2
by 8 to match the holes in the hinges. I wanted that piece of
wood securely mounted like the ramp so I could attach a small
platform to it on the back. That piece of wood could then also
serve as a template for drilling holes in the holding structure.
Though the ramp is lightweight, one piece of wood is a lot easier
to manipulate and clamp in place than a 16 foot ramp.
In this case the holding structure would be two galvanized metal pipes (2 inch interior diamater, about 3/8ths more exterior, standard stuff). I cut two decent pieces from my old poles about 8 feet long each. Those two poles need to be placed carefully to point the ramp in the direction you want and to be a distance from each other which meets the needs of the holes in that 2 by 8. You have some play with the hinges that you don't have with the 2 by 8, so the holes in the 2 by 8 could be stretched left or right a bit if need be.
As far as sinking the poles go, John used his post shovel to dig a hole about one foot deep and eight inches in diameter. We placed the poles in them and pounded them with sledgehammers until they were about 4 feet into the gound (including the one foot hole). Along the way we checked with the post level that the poles were going in strictly vertical and keeping the appropriate distance from each other. Picking the ideal spot is a compromise with your desires, shoreline, and big rocks.
We then held the 2
by 8 at the height where we wanted it and prepared to drill. The
poles, however, were about an inch too far apart. John, put a
tightenable strap around them to pull them closer together. At
three feet above the ground, the poles were still maneuverable a
bit. From there, we clamped the wood at the desired height, made
sure it was level, and drilled the center hole for each hinge
based on the board. You will not get through these pipes with
your home drill and bits, but they are drillable. Then we lifted
the ramp and passed bolts through the center hole of the hinge,
the board, and the pole. Washers and nuts were put on and
tightened moderately. From there, it was just a matter of time
until all three bolts in each hinge were through and fixed. Some
jiggling, tapping with a hammer, and cursing required.
Although we did not, you probably at this point could still make some minor adjustments with the sledgehammer--tap down a notch on one pole, bonk one pole a bit more forward, etc. John used a standard gardening tool to widen the holes a bit, mixed one bag of concrete for each hole, and pored the mix in. After asking John's permission, I cut off the the tops of the poles to the height of the 2 by 8 with my my own Sawz-All. The next morning, it would have been too late to make adjustments. We hoped to anchor the dock the following day. (Note: My old ramp was attached to two poles on the shore as well. The poles were only three feet long and pounded just two feet into the ground without any concrete support. Over the course of 24 years, those poles tipped 4 or so inches towards the lagoon. There is no doubt in my mind these poles are not going anywhere.)
On the overall subject of old pole removal, I had removed one before dragging the dock to my home. I was worried the new dock might be a few inches longer and would not fit within the old four poles. With one removed at the deep end, I had an L-shaped craddle into which any dock would fit. I actually removed a somewhat loose 18-footer from my boat. The general strategy is twist and lift, twist and lift, twist and lift. I levered it over the side of the boat once it was extracted from the mud and got it to balance on the back of the boat. A horizontal pole is always easy to deal with when compared to a vertical pole. I used a regular mid-sized plumbers wrench for the task. When I later did other poles with John, he had some sort of wrench that included a bicycle chain component. His was better at getting a good grip for lifting.
To position the dock, John had some weights attached to ropes that we threw out into the deep end. At the shallow end we attached ropes to a fence and a tree. The other ends of the ropes were all tied to cleats on the dock. The goal is to get the desired overhang of the ramp on the dock while maintaining the ramp in the middle of the dock and parallel to it. You basically fiddle with this until you get close and bored with the process. Nothing stays completely fixed by the ropes as you walk around the dock anyway.
To secure the dock, I bought four of the usual galvanized poles that I hate as much as everyone, but what else is there without a floating pile driver? They were 20-footers (same diameter as the ones pounded into the shore). At the deep end, the top surface of the dock to the bottom was 10.5 feet. The lake was a little less than 2 feet below its maximum. That meant if we drove a pole until it was approximately 3.5 feet above the dock, the pole at the deep end would be around 6 feet in the ground with plenty of room for the lake to rise. You want to do this math as I can see a number of docks from my house that floated over some of their poles last year and came down beside them.
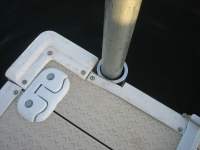 John and I decided
to put a first pole through its fitting. Fittings are important.
My old dock had fittings which were too tight so the slightest
corrosion or gunk would cause the dock to jam. Loose fittings on
the other hand will mean more wobbling and shifting. ACS's
fittings gave me about one quarter inch around the pole which I
consider just right. If you later decide you want a tighter fit,
you can probably find a piece of L-shaped rubber molding or
whatever to circle the fitting until the pole builds deposits.
ACS fittings are also longer than others I have seen which adds
to stability. I actually asked about and wanted to see the
fittings when I first dropped by because they are so important.
Notice also the anti-stubbed-toe cleat design!
To put the pole through the fitting, we needed to get it vertical, position it exactly over the hole, and slide it through. We used the Iwo Jima approach with John near the fitting (the pole resting on it) while I walked closer and closer to him. We got the pole close to vertical, but before we could get it positoned exactly, it tipped back at which point I could no longer support it though I could slow its fall. The leverage factor is completely against you with around 13 feet of pole above the highest grip you can get. (Afterthought: Bungee cord a pillow to the top end of the pole for extra sercurity.)
I was worried we would get it in marginally and then lose control which would give this fitting one hell of a torque test. That scenario might or might not be possible because of the limited room. Luckily our second attempt succeeded. John suggested a third person would have made it much easier. For a pole we tried later, we put it vertically in the water close to the fitting, then raised it, and then tried to position it in. That also ended in a loss of control the one time we tried it. For the poles at the shallow end, I cut them five feet shorter and they were a piece of cake. Get rid of every foot you don't need. It makes an amazing difference.
I should mention I just turned the "New 40" and I guess John is about my age. Neither of us are muscular types, and we are of average height. The pole task may be eaiser or harder for you depending on the bodies you can recruit. If I had a suggestion for ACS, it would be to offer an option of a fitting where two half circles (one welded to the dock and one a separate piece) can be bolted together after the pole is moved in place. This would eliminate the one part of the job where a little bad luck could lead to damage to you or your property. Body strength would not be an issue.
With the one pole ready to be driven in, we went off to pick up the water pump we had reserved for rental. The idea is to pass a lot of water through the pipe so it blows out its own hole as it descends. We had both seen it done, and it looked easy though neither of us had tried it. We fitted all the pieces together at the rental place to check that we had the correct hoses and couplers to attach the output water to a threaded two inch pipe. It was all there.
We put the pump in the middle of the dock for convenience, threw the intake into the lake, and attached the output hose to the pipe. We primed the pump and all the regular stuff, but we never achieved enough pressure to drive the pole even one inch down. Upon disonnecting the output hose from the pump to see what sort of water flow we were generating, we observed it was close to nothing. As boaters, we assumed the impeller was shot and brought the pump back. The rental company promised us another one the next day.
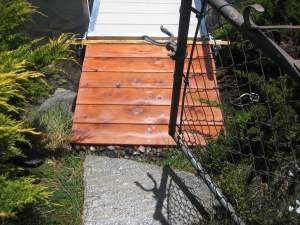 To keep myself
busy, I built a three foot by three foot redwood landing to cover
the distance from the shore to ramp. I drilled a few holes,
bolted it into the 2 by 8, and spread some small rocks behind it
to fill a gap to a piece of flagstone. As any home enthusiast
would, I used screws twice as long as necessary and angle
brackets. Better to be overbuilt than underbuilt.
I suppose I might have had ACS build a landing with the light beige decking material, but I did not know a precise size at the time and thought beige decking would stand in stark contrast to the surrounding bushes and might get very dirty. As it is, the landing will become a close match to the color of ground in a year and blend in with the shore.
Although the pole driving experience had ended in a diagnosis of a bad pump, it was obvious John and I had been thinking how we might have done better. First off, the output hose tended to kink where it was attached to the top of the pole. The pole is going up, the hose needs to go down--the ideal kink situation. To avoid that, we picked up a few small pieces and made an attatchment for the pole that would let the hose hang down from it. We also decided to move the pump to the side of the dock so the amount of air initially in the intake hose would be minimal. Finally, instead of letting the bottom end of the pole just sit in the mud, we decided to pick it up, and get some flow going freely before we started the dive down.
 We fetched the pump
with all the same pieces and hoses we had had the day before, so
we skipped the full assembly test. Of course, when we got home,
we discovered this pump, did not have the same input fixture the
other pump had. Back to the rental place for another piece.
We first ran the pump with no output hose and, voila, we had good water pressure. We attached the ouput hose to the pump. John climbed a ladder to attach our new part to the pipe and the hose to the new part. I grabbed the pole and John fired up the pump. Lifting the pole slighty I could see bubbles and a thunderstorm cloud of mud spreading quickly. When I let the pole down, it started descending on its own at a rate of around a foot every five seconds. It was unbelievable. John shut off the pump when we got to the desired depth. If it went a bit too far, it was possible to twist and lift the pole up a bit and let some mud slide back under it. These poles will rise here and there over time anyway.
 John and I are both
the laid back types so our high five was not very high, but we
both had a great moment of relief and satisfaction. That's John
standing next to the first driven pole. You can see his hand
resting on our attachment. We put in the other three pipes. The
ones for the shallow end did not drop nearly as quickly. The pipe
had to be lifted a bit four or five times on the way done to blow
away something. We were certainly lucky that we never hit a dead
end rock. I don't know what we would have done about that. I
suspect the odds were in our favor.
Before driving in each pole, we checked the placement of the ramp on the dock and decided to lean a little in some direction or try to keep the pole to one side of the fitting. I'm not sure that made any difference. The ramp actually ended up completely parallel to the dock but an inch and a half more to one side. It is very easy to come up with a reason (afterwards) why having a little more space on one side is good. In this case, it will make it easier to put the kayak in the water. If the extra space had been on the other side, I would have a bit more room when attaching the bow rope of the boat.
Oh! After we sunk the first pole at the shallow end, we did not have room between the pole and the ramp to rotate the attachment and unscrew it from the pole. The instant the attachment struck against and became blocked by the ramp, we had an amusing momentary exchange of Laurel and Hardy "what do we do now?" facial expressions. We rotated the pole and unscrewed it from the attatchment (which also could have been disassembled). There is a thing called a "union" (I needed one once for a sprinkler system fix) that lets you take apart a bunch of pipe connections from the middle. Placing one of those between this attachment and the pole might be, but probably is not, worth the bother.
I should note that the poles have somewhat more wobble to them than the ones we took out. With time, I suspect the silt will fill in the cavity we must have created with the flowing water. Speaking of time, all docks look best the year they are installed. I'm sure that applies to my dock as well though I hope the materials used will minimize the effects of aging.
My motive in telling this story is quite simply to share what I regard as a very successful help-yourself solution to what originally seemed a somewhat daunting and costly problem. I have put a table of the hard costs involved at the bottom of this page if you did this yourself this summer. The total will be a function of how much you do yourself and who you get to help you if help is needed. John and I, are both semi-retired and would consider doing dock jobs for others in the Keys. I think it would be fun. We would want to do projects where the goal is a great dock, ramp, and landing that is perfectly functional but meets those needs without excessive coverage of the natural surroundings.
We are doing John's dock next which will have an L shape, sit parallel to the shore, and require both a bridge and a ramp. I'll put up some pictures when it's done.
If you want to contact ACS Marine as part of your search for possibilities, call Todd Souza, the owner, at 209-465-1700. Their website is http://www.acsmarine.com.
My name is Peter Roizen. You can leave a message at 408-370-0475. So you won't be surprised, it's the business line for my game company, WildWords. BTW, it is a great game worth buying for yourself and others, and costs about as much as one cleat! I check WildWords' messages every few days. Better yet is to email peter@roizen.com. Feedback is also welcomed. I would be pleased to know that someone found this page helpful.
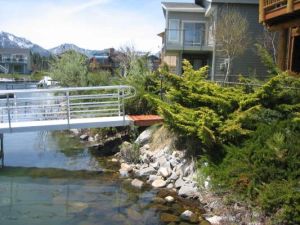
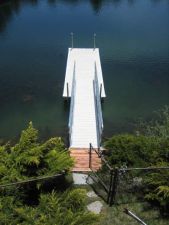
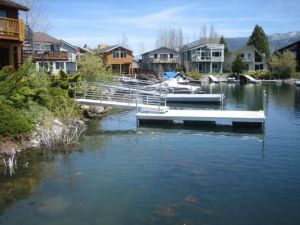
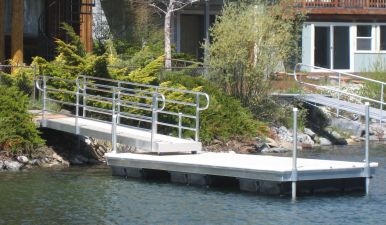
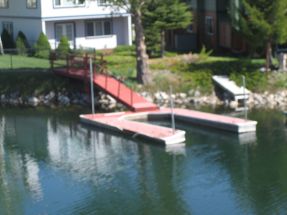
The final result is below. According to my brother, even the boat looks happy.
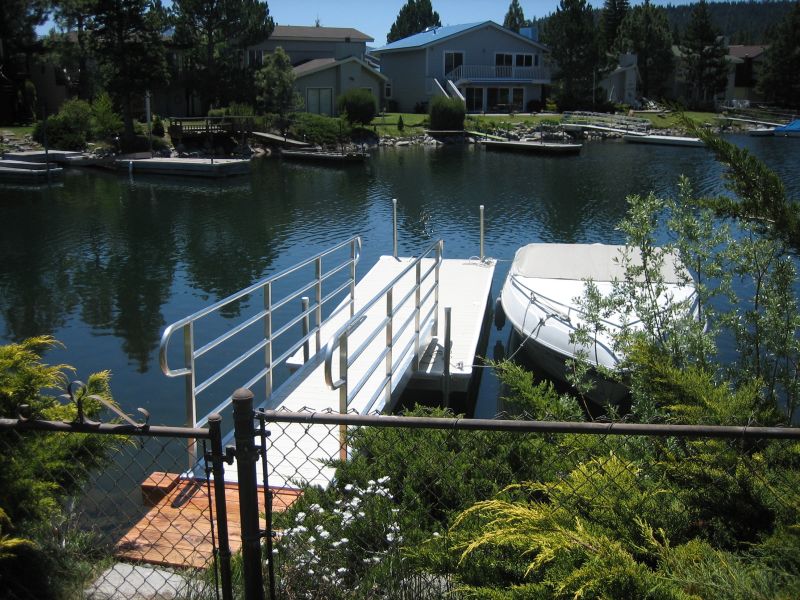
I put a little stain on the non-redwood 2 by 8 (I would just use redwood next time) and added some small boxes to hide the pole tops and bolts that hold the ramp in place. I could make the boxes smaller if I were willing to cut off the ends of the bolts and some of the 2 by 8, but I am not willing to do that. So far no goose has been seen or left any evidence on the ramp or dock, ducks and muskrats swim between the gaps in the floats, and the occasional little bird appears to enjoy sitting on the ramp railing. I have also noticed that this ramp is a place to stop and pause, and kids even fish from it--these things never happened with the previous ramp.
Some other angles:
 My
ramp currently overhangs the dock by 3.75 feet. Many of the docks
in my neighborhood currently have overhangs of two feet or less
and most all have steeper slopes. I believe the placement I used
is more appropriate. I also find it more aesthetically pleasing.
The dock and ramp don't look so much like two unrelated pieces,
and the dock will tip less towards the back too.
Lake Tahoe's maximum level is an
elevation of 6229 feet. In 1992, it was 6220 feet. That's a
variation of 9 feet which is too much to cover completely. As
recently as 2005, it was at 6223 feet.
At about 6223 feet, the float on the shore side of my dock will
touch the mud. One of the reasons I only got an 18 foot dock
(instead of the 20 I was allowed) was to keep the shore side
farther from the shore while still maintaining the limit on
protrusion into the water. Many owners and contractors totally
ignore these limits. I tried to live within them, because I think
they are reasonable.
Some things I
noticed in my neighborhood looking at seven of the nearest ten
docks:
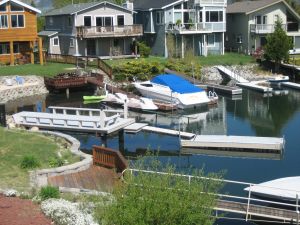 I think this sort of thing with a long pier, ramp, and dock is unfortunate for the whole neighborhood. They tend to turn out awkward as well. The ramp, in this case, is far too short to deal with water level variation. |
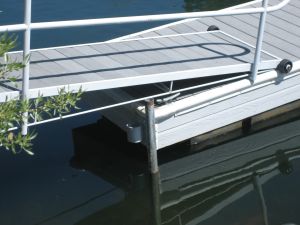 This dock had but one fitting on the back and it floated over the pole at high water last year. This is Trex. The truth is I don't like gray either. For me, it's too "naval shipyard." It's strange that the floats were not placed as far back as possible. |
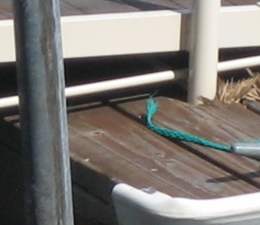 This ramp (like the previous one) is not flat on the bottom. The pole on the ramp is actually digging into the dock when the water level is high. Ouch! |
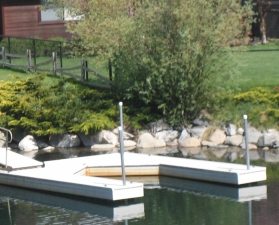 This, to me, shows the negatives of skirting the floats. Yellow scum accumulates on the skirt and the dock looks brick-like. |
 U-shapes can have a tough time holding their shapes. This ramp is set too high on the shore. With the ramp sitting towards the center of the U, it has almost nowhere to roll in either direction. |
 Two other docks across the lagoon from me have ramp access problems. In one case, the ramp fell off and was placed on the dock. It's amazing how many ramps are placed with only today's water level in mind. |
For those who have to change the shoreline, I very much like this approach. There are no railings rising up. The base color is close to the color of the ground. You hardly notice the brickwork at all. And, it would apprear to provide a pleasant area to sit near the dock.

Approximate hard costs for doing the same project today (Summer, 2007, check with ACS to be sure the dock and ramp prices are accurate and current):
| 18 by 6 Dock (108 sq. ft) at $45 (?) per square foot (plus tax) | 5,260 |
| 16 by 3 Ramp with railings at $150 (?) per linear foot (plus tax) | 2,600 |
| Installation hardware (poles, wood, cement, etc.) | 500 |
| Pump rental | 125 |
| Launch fee, dump fees (old stuff), gas to get the stuff in Stockton | 500 |
| Total | 8,985 |
For longer, shorter, wider, or thinner docks you can calculate the cost by multiplying the square footage by the unit cost and adding about 8% tax. I am not sure if the 3 foot wide ramp can be made thinner. I know the price per foot goes up for ramps over 20 feet. I do believe ACS pricing will go up around 15% next year. Their prices are low compared to another aluminum manufacturer that John checked. Give ACS a call to be sure.
Having John and I fetch the stuff from Stockton, do the installation, and build a workable landing would add $3,000 approximately. We would be happy to take a look at what you want to do.
As for removing your old dock, you could do it yourself, we could bid on it, or you could find someone else to do that job.